PhreekySicko Geschrieben 11. Dezember 2006 Share Geschrieben 11. Dezember 2006 what color do you have in mind for painting the cage? 0 Zitieren Link zu diesem Kommentar Auf anderen Seiten teilen More sharing options...
Monster-Mat Geschrieben 11. Dezember 2006 Autor Share Geschrieben 11. Dezember 2006 the cage will more than likely be white aswell for the time being as it makes it easier to get the whole inside painted....... i can then mask off and paint the cage any other colour at a date which isnt so busy for me 0 Zitieren Link zu diesem Kommentar Auf anderen Seiten teilen More sharing options...
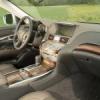
Monster-Mat Geschrieben 11. Dezember 2006 Autor Share Geschrieben 11. Dezember 2006 ok...some daylight pics.... 0 Zitieren Link zu diesem Kommentar Auf anderen Seiten teilen More sharing options...
CruizinKev Geschrieben 11. Dezember 2006 Share Geschrieben 11. Dezember 2006 niiiice man!! 0 Zitieren Link zu diesem Kommentar Auf anderen Seiten teilen More sharing options...
Monster-Mat Geschrieben 15. Dezember 2006 Autor Share Geschrieben 15. Dezember 2006 ah, more electronical wizardry, has to take place............. have to move the 2 footwell fusebox's...... the drivers side fusebox, will be relocated to behind the Passenger seat the fire extinguisher will go back in the same location it was located on the Blue car 0 Zitieren Link zu diesem Kommentar Auf anderen Seiten teilen More sharing options...
RoadRash Geschrieben 18. Dezember 2006 Share Geschrieben 18. Dezember 2006 Will this Monster get finished once a time?!? :( Seems there is always some work to do, but I know how it makes fun to finish and finish and finish and finish the own project. B) Is this a NOS bottle or a fire extinguisher in the middle? :naughty: 0 Zitieren Link zu diesem Kommentar Auf anderen Seiten teilen More sharing options...
Monster-Mat Geschrieben 20. Dezember 2006 Autor Share Geschrieben 20. Dezember 2006 fire extinguisher Mike...... Because of where the front legs of the rollcage were welded in , it means i had to move the location of the fuse boxes......... now, everything on the steering column re wired less the nice little illuminating ring, around the key ive still goto rewire the plugs from the drivers side that went into the fusebox, to the fusebox now behind the passenger seat, and then make the wires for the plugs for the passenger side fusebox around 4" longer then......im at the point i was hoping to be at , last week before i got the car back with the cage in once im happy everything works again....it will all come out again, the insides will be painted, then re-install all the loom put the dash back in move and tidy up the wires for the F Con V pro seats in wire in the new instrument cluster plumb in the remainder of the fuel system plumb in the fire extinguisher blah blah blah 0 Zitieren Link zu diesem Kommentar Auf anderen Seiten teilen More sharing options...
RoadRash Geschrieben 20. Dezember 2006 Share Geschrieben 20. Dezember 2006 Stupid question: What for is the speaker in the front door? ;) There is no radio any more. Maybe for radio com during drift contests?!? :) 0 Zitieren Link zu diesem Kommentar Auf anderen Seiten teilen More sharing options...
Monster-Mat Geschrieben 20. Dezember 2006 Autor Share Geschrieben 20. Dezember 2006 i just havnt got round to removing them yet ;) 0 Zitieren Link zu diesem Kommentar Auf anderen Seiten teilen More sharing options...
Monster-Mat Geschrieben 8. Januar 2007 Autor Share Geschrieben 8. Januar 2007 Mike...u will notice, ive removed the speakers now :scared: ..not got much done over the past week...done some more wireing, also sorted out the dash bar, which needed re-possitioning to allow the original heater box to be refitted, also sorted out the steering column mount and brackets....and now have the fuse box's mounted. test fitted a spare dash i have, and all seems to fit in well enough, only minor trimming required and..... the cage is now painted.... and started to put the dash and bits back in.... and new rear spoiler on..:wub: i still have some of the old loom to rewire, need to get the ecu holder from Sumo, and wire in all the new sensors also need to get the fuel cell mounting/case made up still, as well as tons of niggling things 0 Zitieren Link zu diesem Kommentar Auf anderen Seiten teilen More sharing options...
CruizinKev Geschrieben 9. Januar 2007 Share Geschrieben 9. Januar 2007 yeah nice!!! your exhaust reminds me on my thing I'll get soon too :scared: 0 Zitieren Link zu diesem Kommentar Auf anderen Seiten teilen More sharing options...
Leexus Geschrieben 9. Januar 2007 Share Geschrieben 9. Januar 2007 holy cow :shocking: :clap: excellent work :clap: :clap: 0 Zitieren Link zu diesem Kommentar Auf anderen Seiten teilen More sharing options...
FreakMR2 Geschrieben 9. Januar 2007 Share Geschrieben 9. Januar 2007 I love your car, it's hot :shocking: Was this a complete hood, or did you install a vent into your original hood? I ask because it looks awesome and this vent would be great for a project on my car... 0 Zitieren Link zu diesem Kommentar Auf anderen Seiten teilen More sharing options...
RoadRash Geschrieben 9. Januar 2007 Share Geschrieben 9. Januar 2007 What a hot ride man.... always nice to see it! :shocking: 0 Zitieren Link zu diesem Kommentar Auf anderen Seiten teilen More sharing options...
Monster-Mat Geschrieben 24. März 2007 Autor Share Geschrieben 24. März 2007 ok, back for the weekend..........been away working ....again Wiring nearly finished, or should i say the factory wiring that had to be redone due to the slight oversight of the roll cage manufacturer, to actually leave space for the fuseboxes in the footwells...............hmmm the drivers side fuse box is now located behind the passenger seat the centre console needs redoing, the cabin heater controls are now in the glovebox .. need to fasten all the cables down now....final hurdle was getting the dam lights working, after about 4 hours of faffing about finally got my "daytime running light" modification working (DRL is what the high beams are used for in the USA, so have done away with the high beam) also finally got the IS300 factory HID working on the car.... DRL DRL and HID still need to drop the factory fuel tank, mount the fuel cell, run the rest of the fuel lines, and plumb them in.....then redo centre console and the final bits.....when, Dunno! 0 Zitieren Link zu diesem Kommentar Auf anderen Seiten teilen More sharing options...
CruizinKev Geschrieben 24. März 2007 Share Geschrieben 24. März 2007 maaaaaaaan so nice!!! :naughty: :thumbup: 0 Zitieren Link zu diesem Kommentar Auf anderen Seiten teilen More sharing options...
Monster-Mat Geschrieben 31. März 2007 Autor Share Geschrieben 31. März 2007 a Pal came down and helped get me back on track, and do my ally welding for me...and what a sorted Job was done, it was a long ol day, with interesting weather.................to say the least! Firstly was to remove the radiator, as the original filler neck would be removed, and a hole needed drilling in the bottom tank, the filler neck and the hole had Weld on unions...erm welded on I had to modify, the new power steering pot(small one) and the self bleeding coolant header tank (other one) after the radiator was installed back in, you can see where the top bleed hose now is fitted, onto the welded union at the top of the radiator...where the original filler neck was you can also see the modified aluminium Greddy top radiator pipe...that was also done today, was designed for a Supra, so needed trimming to fit in the engine bay of the IS200 and here is where the feed pipe from the self bleeding coolant header tank feeds back into the system, bottom of the radiator After a bit of magic, the aluminium fuel cell container was fabricated.............. a different View...Jimbo at the front...cheers Mate, excellent Job new power steering pot....awaiting a mounting bracket making up.................. and the coolant self bleeding header tank and its plethora of fittings.......the header tank was got from a scrapped NASCAR in the US, a Friend, deals with the end of life recycling of many of Race teams cars, the original over flow tank, will now be located under the passenger side fender the fittings will allow another x2 coolant returns/bleeds to be installed, it also has a pressure test point, so the system can be pressure checked using compressed air 0 Zitieren Link zu diesem Kommentar Auf anderen Seiten teilen More sharing options...
RoadRash Geschrieben 1. April 2007 Share Geschrieben 1. April 2007 Always amazing to watch this thread about your hellmachine! :) Would like to know the total weight of your Monster right now?!? :thumbup: 0 Zitieren Link zu diesem Kommentar Auf anderen Seiten teilen More sharing options...
Monster-Mat Geschrieben 8. April 2007 Autor Share Geschrieben 8. April 2007 Bazza and Jane (his better Half) came down this weekend....helped me do a little bit of work...... well not much to show for 3 days hard graft, the instruments wiring has been a royal pain in the ass. also ran the car up with the new cooling system layout...all works fine, but i need a small adaptor for the radiator union as it fouls the bonnet, also made a temporary fix for the coolant overflow from the coolant header tank.... this afternoon went on a bit of a Jaunt on the Training area near my house, and just happened to stumble upon an old Lynx Military Helicopter, so liberated it of some of its wiring products!! tomorrow will get the tacho up and running...hopefully, then start tidying up all the wiring......maybe also need to fit the isolator cut off switch, and the fire extinguisher pull handle....then i can cover the centre console switch panel 0 Zitieren Link zu diesem Kommentar Auf anderen Seiten teilen More sharing options...
Monster-Mat Geschrieben 10. April 2007 Autor Share Geschrieben 10. April 2007 well had a play with the tacho...now its working, played with the shift light settings, and fitted the shift light tachooperating.flv - Video - Photobucket - Video and Image Hosting then made up the proper centre console mounts and trimmed the console in a bit of Alacantera i had lying around, now....the car looks like its coming together tommorow will fit the Extinguisher pull...........(maybe) 0 Zitieren Link zu diesem Kommentar Auf anderen Seiten teilen More sharing options...
Monster-Mat Geschrieben 11. April 2007 Autor Share Geschrieben 11. April 2007 got the last of the instruments in... EVC 5, to the right of the steering wheel and short of finally plumbing the feed and return lines from the fuel cell.....fire extinguisher tubes, and a few little bits....blah blah the car is almost complete!!!, which should be great as i am away for another 5 weeks very soon, so shouldnt have much to come back and do so.. front lip or no front lip 0 Zitieren Link zu diesem Kommentar Auf anderen Seiten teilen More sharing options...
PhoneDrome Geschrieben 11. April 2007 Share Geschrieben 11. April 2007 (bearbeitet) Hi Mat, so what ist your timeline for this year? Any D1UK challenges to take part? Meetings? When will the car be ready?... May is peeping through my window... Go for "front lip"! bearbeitet 11. April 2007 von PhoneDrome 0 Zitieren Link zu diesem Kommentar Auf anderen Seiten teilen More sharing options...
Moerser Lex Geschrieben 11. April 2007 Share Geschrieben 11. April 2007 of course WITH the lip. :ph34r: Or do you want the car look like a standard car? :thumbup: 0 Zitieren Link zu diesem Kommentar Auf anderen Seiten teilen More sharing options...
Monster-Mat Geschrieben 18. Mai 2007 Autor Share Geschrieben 18. Mai 2007 ive not been around much to do anything...so had the car shipped of to TDI to get me on track a little more..... factory fuel tank now removed, old twin hiper boxes removed...just need to work out how im going to do the exhaust now and i just like this shot..... still have to run the new fuel lines........ the car is at TDI to finish of the fuel lines and do a few alterations..... the fuel line routing has been going well. Running them under the car.. Pump and filter... The swirl pot and primary pumps......almost done now The box for the fuel cell was made a while back, ive had the rear cusco brace modified to fit with the Fuel cell, and also support and secure the cell at the same time.... 0 Zitieren Link zu diesem Kommentar Auf anderen Seiten teilen More sharing options...
Boergy Geschrieben 19. Mai 2007 Share Geschrieben 19. Mai 2007 good work! :shocking: how much pressure have you for the fuel system in the monster? Original IS200 3,1-3,5 bar. greets Tom´S 0 Zitieren Link zu diesem Kommentar Auf anderen Seiten teilen More sharing options...


Recommended Posts
Join the conversation
You can post now and register later. If you have an account, sign in now to post with your account.